Track Context Menu
Overview
The Track context menu provides information about the Track in both text and graphic forms. It allows you to add information, make changes, edit, and perform various other actions with the track. You can access the track context menu by simply tapping the needed track on the map or using menu My places (Menu → My Places → Tracks). You may need to open the track folder and select the desired track by tapping it.
- Android
- iOS
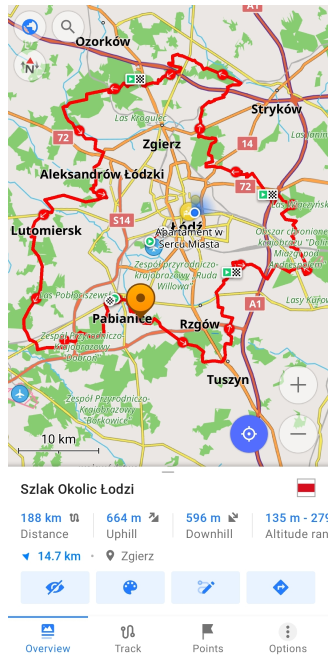
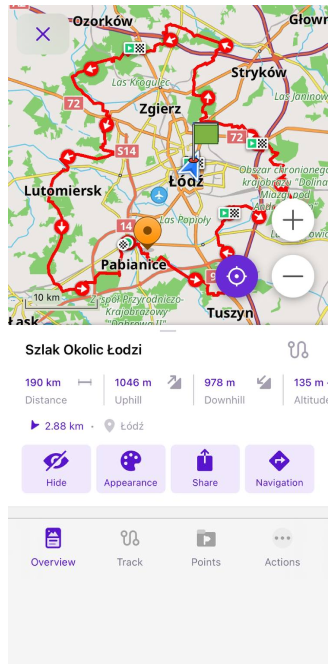
Track Overview
When you tap a track, the first screen opens of the Track context menu - Overview tab. On this tab, you can find a summary about the chosen track (Info panel) and make the most common actions with the track using Track actions menu. You can see description and service information about your track if you pull the Overview tab up.
Info Panel
- Android
- iOS
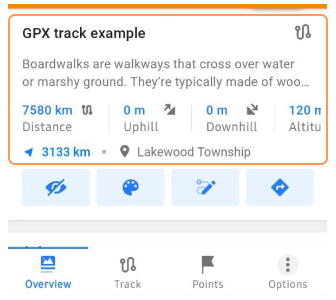
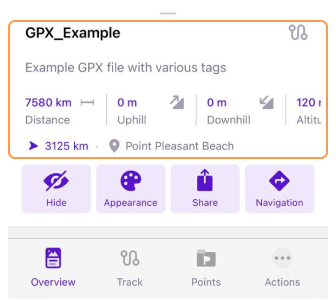
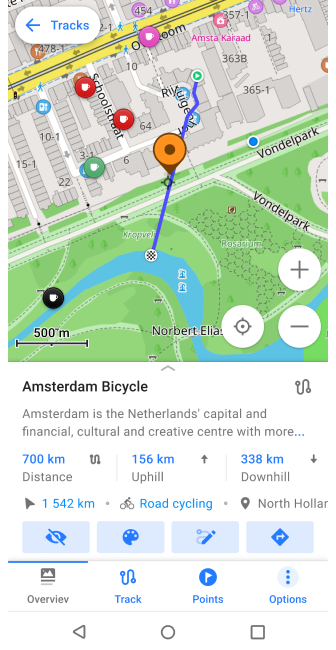
At the top of the information panel, you can see the track’s name and the symbol used to mark it (Android only). The track name can be changed using the rename function in the Options menu. Some tracks (mostly the Travel guides) may have a short description and (or) a picture below the Track name. An arrow shows Direction to the nearest point of the track from My location.
The info panel also provides information about the following:
- Distance. Shows track length.
- Uphill / Downhill. Displays the total sum of ascents and descents during the trip.
- Altitude range. Indicates min and max altitude on a track.
In case your track was created in OsmAnd or any other tracking app (so its points have time and speed tags), the informational panel will also contain information about Average speed, Maximum speed, Duration (the total time between the start and end points of the track), and Time moving (the sum of time while in motion).
Note: For recorded tracks, Duration shows the actual travel time based on timestamps. For planned tracks, Duration shows the estimated time calculated from the route length and the selected navigation profile’s average speed, if the entire route uses one profile and contains no straight-line segments.
Track Actions
- Android
- iOS
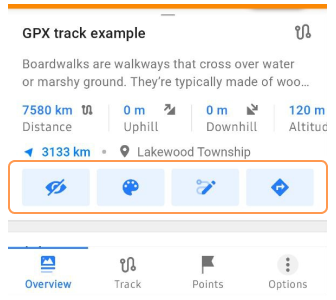
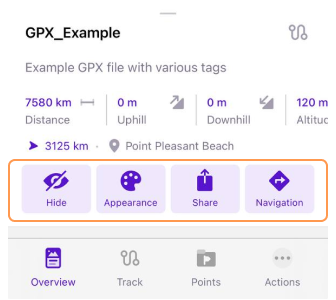
- Show / hide buttons. Changes the visibility of the track on the map.
- Appearance. Customize the appearance of your track.
- Edit track (Android). Opens the track in Plan a route tool.
- Export (iOS). Allows you to export a track.
- Directions. Opens the track in Navigation mode.
Options
- Android
- iOS
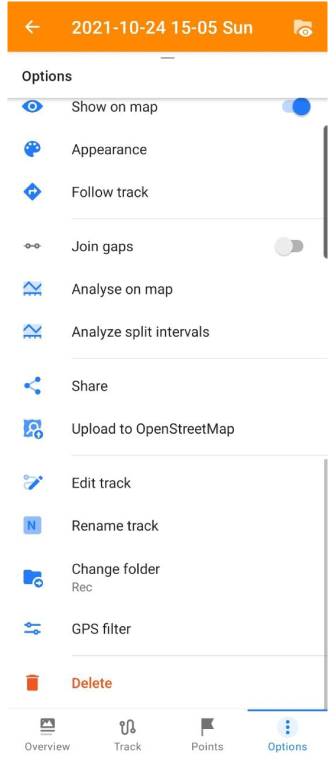
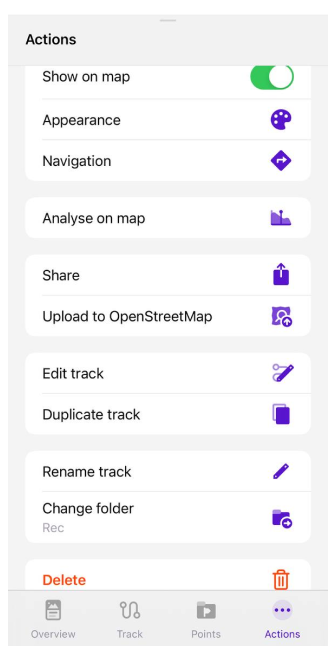
The menu Options allows you to manage and modify the selected track with various tools and settings.
- Show on map – Controls the visibility of the track on the map.
- Appearance – Opens the Appearance menu to customize the track’s color, width, and transparency.
- Follow track (Android) / Navigation (iOS) – Starts navigation by track., aligning your route with the selected track.
- Join segments (Android only) – Merges track segments to fill gaps.
- Analyze on map. Opens the Analyze on map tool to inspect the track’s elevation, speed, distance, and any additional data contained in the track (such as external sensor or vehicle metrics data).
- Analyze by intervals (Android only) - Analyzes the track by time or distance intervals.
- Share – Exports the selected track in a GPX format via the system Share menu.
- Upload to OpenStreetMap - Uploads the selected track to OpenStreetMap.
- Edit track - Opens the Plan route tool for modifying the track.
- Duplicate track (iOS only) – Creates and saves a copy of the track.
- Rename track – Allows changing the track name.
- Change folder – Moves the track to another folder or creates a new one.
- GPS filter (Android only) - Allows filtering points of the track to refine accuracy.
- Elevation correction (Android only) - To receive elevation data, attach your track to the roads or calculate it offline (needed Terrain maps).
- Simulate your position (Android only) - Simulates your position using a GPX track.
- Delete. Deletes the track.
Description and Info
- Android
- iOS
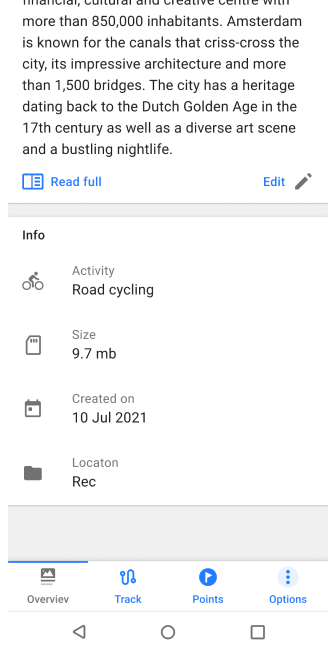
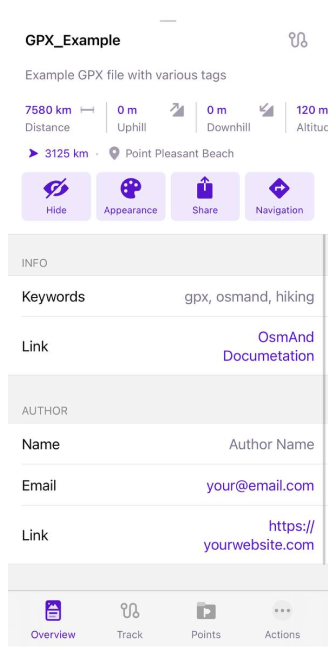
This section of the Overview tab displays tag data and all general information.
-
Description. Edit (Android) / Edit description (iOS) button is used to edit the track description. Tag
desc. -
General. Contains information about the GPX file size, file folder, and creation date with the
timetag. -
Info. Tags: Keywords -
keywords, Link -link, Activity -activities. -
Author. Tags: Author -
author, Name -name, E-mail address -email, Link -link. -
Copyright. Tags: Copyright -
copyright, Author -author, Year -year, License -license. -
Additional. All tags from extensions section:
address,icon,background,color,country,state,telephone,postcode,start_date,desc.
Example XML code of GPX file
 <metadata>
    <name>GPX File Example</name>
    <desc>Example GPX file with various tags</desc>
    <author>
      <name>Author Name</name>
      <email id="your" domain="email.com" />
      <link href="https://yourwebsite.com" />
    </author>
    <copyright author="OsmAnd B.V">
      <year>2023</year>
      <license>https://github.com/osmandapp/OsmAnd/blob/master/LICENSE</license>
    </copyright>
    <link href="http://docs.osmand.net" />
    <time>2023-12-13T12:00:00Z</time>
    <keywords>gpx, osmand, hiking</keywords>
    <extensions>
      <osmand:address>Floyd Avenue (The Fan) 907, Richmond</osmand:address>
      <osmand:icon>place_town</osmand:icon>
      <osmand:background>circle</osmand:background>
      <osmand:color>#ff4e4eff</osmand:color>
      <osmand:country>United States</osmand:country>
      <osmand:state>Virginia</osmand:state>
      <osmand:telephone>(804) 828-0100</osmand:telephone>
      <osmand:postcode>23284</osmand:postcode>
      <osmand:start_date>Thursday, June 8, 2023</osmand:start_date>
      <osmand:desc>Boardwalks are walkways that cross over water or marshy ground. They are typically made of wood or other smooth materials and are accessible to wheelchairs. Please check with your park to see if there are accessible trails available. Boardwalks are often near parking lots, so expect large crowds.</osmand:desc>
    </extensions>
  </metadata>
Track Activity Type
- Android
- iOS
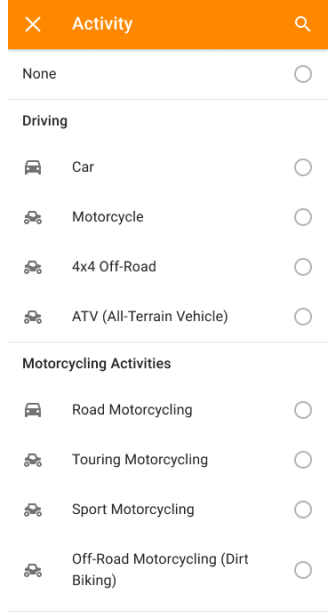
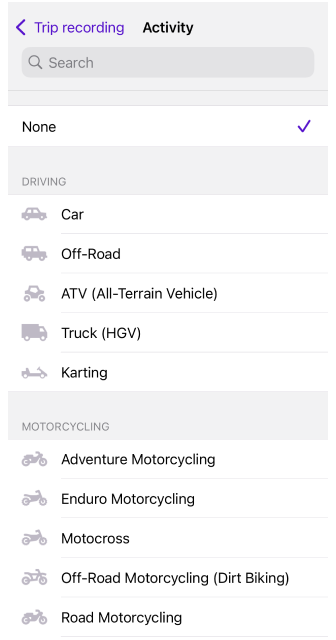
The Activity feature in OsmAnd allows you to tag recorded GPX tracks with specific activities for further analysis and organization in folders.
- Activity tags for GPX tracks. Recorded tracks automatically receive an activity type based on the selected profile, which helps categorize and filter them later. You can change the activity manually if needed.
- Activity filter. You can filter the recorded GPX tracks by activity, which allows you to focus on finding specific types of recordings, such as all biking or hiking tracks.
- Manage activity types. You can change the activity type for selected folders or tracks using the selection mode in the Tracks tab of the My Places menu.
- Activity list. The activity categories and groups are defined in OsmAnd's resources. For developers and contributors, the activity list is maintained in a structured format at activities.json, which details the available activity groups and types.
Altitude / Speed Graphs
On the Track tab, you can find information about the track in graphical form. Using the switch, you can choose which data to display on the graph: separate data on Altitude, about the Speed (this option is available only for recorded tracks) or display altogether (Overview).
Interaction with the graph:
- Place a point on the graph. If you want to see the information at a particular point of a track, you can tap anywhere on the graph and a pointer with the values will appear. At the same time, a blue marker will appear on the map, pointing to that location on the track.
- Zoom in/out. You can use two-finger movements to zoom in and out for a more detailed view. After zooming in, you can move the graph to the right and left, corresponding to moving forward and backward along the route.
- Additional information. The right side of the graph contains data about the lowest, highest, and average altitude, slope, and speed. At the bottom of the graph, you can see the distance marks.
Overview Information
- Android
- iOS
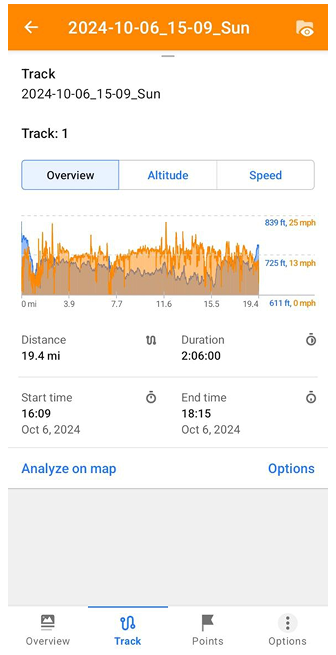
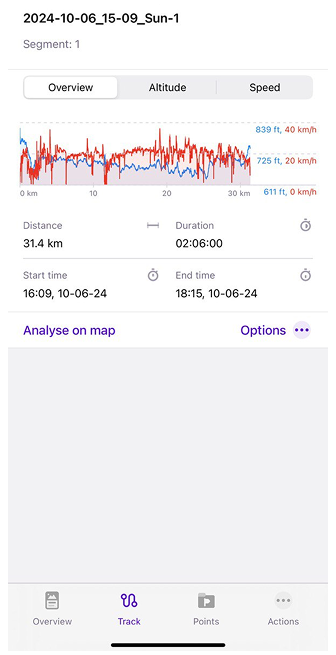
On the Overview tab, you can see parameters such as:
- Distance. The sum of the total distance traveled on the track, or the length of the track itself.
- Duration. The time interval between the start and end points of the track.
- Start time The exact time when the recording of the track starts.
- End time. The end time of the track recording.
The active buttons give access to actions such as:
-
Analyze on map button opens Analyze track menu for the track.
-
Options button opens a menu with:
- Edit opens the track in Plan route tool.
- Delete allows you to remove the selected track element.
- Split interval opens Split interval function for the track.
Speed
This tab can only be visible only on recorded tracks. Points on this type of track have speed tags.
- Android
- iOS
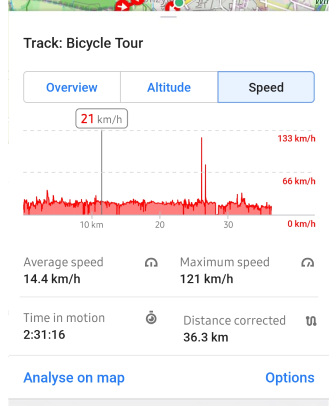
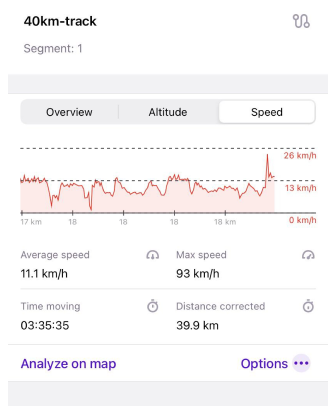
The Speed graph displays metrics such as:
- Average speed. Indicates the average speed during the trip.
- Maximum speed. Shows the maximum speed during the trip.
- Time in motion. Shows the total time during the trip in motion only.
- Distance corrected. Indicates the adjusted distance of the trip.
Altitude
- Android
- iOS
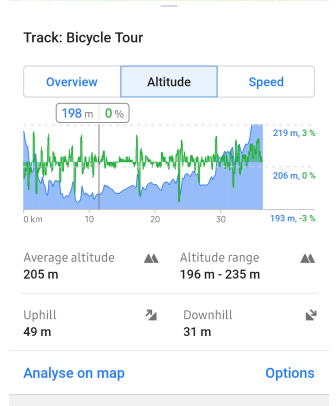
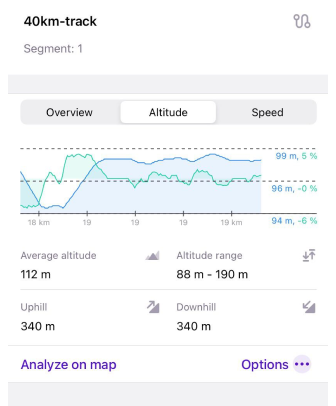
The Altitude graph displays metrics such as:
- Average altitude. Indicates the average altitude above sea level on the route.
- Altitude range. The highest and lowest altitude recorded on the route.
- Uphill. The cumulative gain in altitude above sea level along the route.
- Downhill. The cumulative loss of altitude along the route.
Get elevation data.
If there is no elevation information on the route, you can add it in the following ways:
- Calculate elevation button → Use nearby roads. Utilizes an offline map to find nearby roads and elevation data. It allows you to customize the geometry of the track.
- Use Terrain maps. Utilizes terrain maps to obtain elevation data. The track geometry remains unchanged.
Calculate Missing Elevation
Calculate elevation offline feature is only available for OsmAnd Pro subscribers 
This feature is currently not available for the iOS version of the OsmAnd app.
This feature allows you to calculate the elevation profile for GPX track offline for any terrain between 70 degrees north latitude and 70 degrees south latitude, based on Terrain map data. Terrain maps (3D) should be previously downloaded.
-
Download Terrain maps (3D) for the required region.
-
If the track does not contain any altitude data, go to the track context menu (Track context menu → Track → Altitude → Calculate elevation), select Use Terrain maps, and after the calculation you will get a track graph based on the terrain data.


-
If you are creating a route with the Plan a route tool using the Straight line method and there is no elevation data on the graph, you need to:
- Tap Get elevation data, then select Use Terrain maps.
- After the calculation, you will get your route's complete Altitude/Slope graph based on terrain data.


Points / Waypoints
Waypoints are one of the types of points available on the map. In general, they can be track points that are part of GPX files. A detailed description is available in the points on the map article.
- Android
- iOS
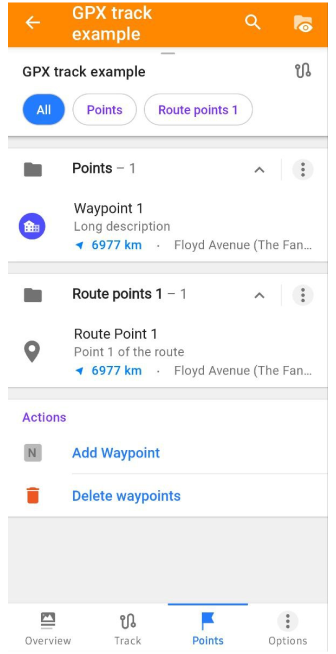
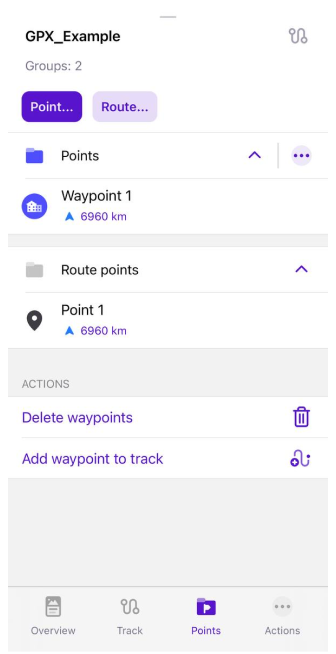
In this Points tab:
- Show track points data and modify your track points (waypoints and route points), delete it and add waypoints to a track.
- Create and modify Group (folder) of points.
Add Waypoint to a Track
Waypoints can be added to the currently recorded track or to any track from My Places → Tracks list:
-
Use the map context menu.
- Waypoints are automatically displayed if the selected track is enabled on the map.
- Long tap the map at any chosen location to create a waypoint.
- You can set information about the waypoint in the opened map context menu.
-
Use Add Waypoint button of the track context menu.
-
Add a waypoint as a Quick action button.
Create Waypoint
- Android
- iOS


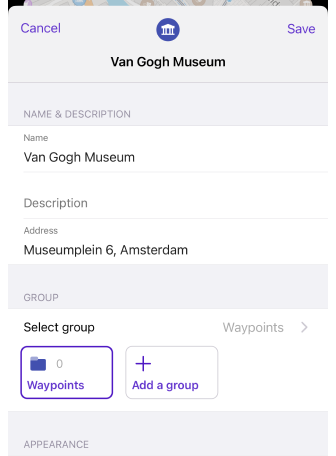

Tap the Add Waypoint button to open waypoint creation screen (this screen is familiar with Favorite Context menu).
-
Add Name of the waypoint, Address of the selected location and Description for it (optional).
-
Select Group.
- Select previously created group categories or create a new one.
- Create a name and appearance for the new waypoint group. This is also called new category in the application.
- The icon, icon color, and shape will be used for all new waypoints added to the group.
-
Appearance setting:
- Select an icon from the list of all POI categories icons.
- Select Color of the icon.
- Then select the Shape of the icon: Circle, Octagon, Square.
-
Replace another point with this, if you need to.
Actions with Groups
- Android
- iOS
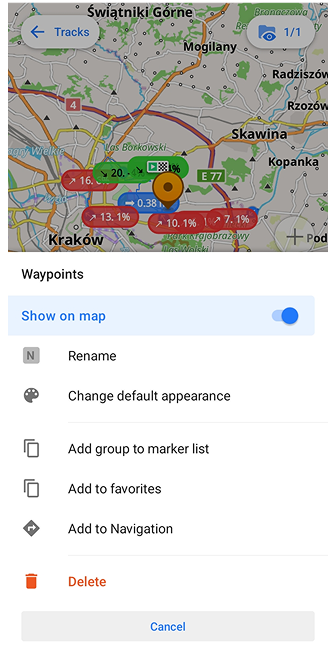
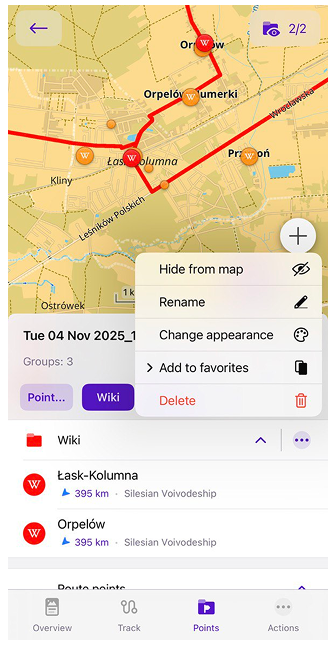
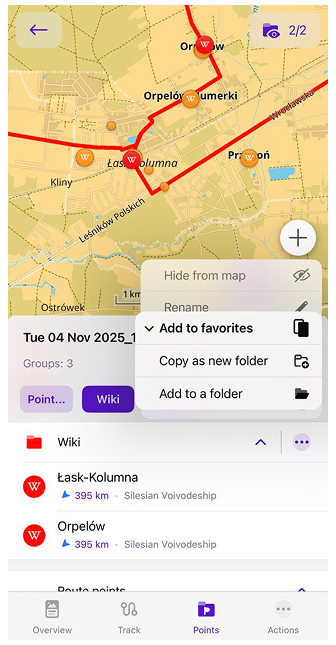
The three-dot menu ( ⁝ ) opens the waypoint Group menu.
Actions:
- Show on map - Allows you to display or not display group waypoints on the map. Or you can use the screen button to display or omit group waypoints on the map.
- Rename - Change the name of the group.
- Change default appearance (Android) / Change appearance (IOS) - Change the display options for a group of waypoints.
- Add group to marker list or Remove (Android only) - Move group waypoints to Map markers list.
- Add to favorites - Allows you to copy the selected group of Waypoints into Favorites. You can choose one of two options: Copy as new folder or Add to a folder.
- Add to Navigation (Android only) - Creates a route between waypoints. The first and last points become the start and finish of the route, and the rest are converted to intermediate points.
- Delete - Delete a group of waypoints.
Waypoint Groups
- Android
- iOS
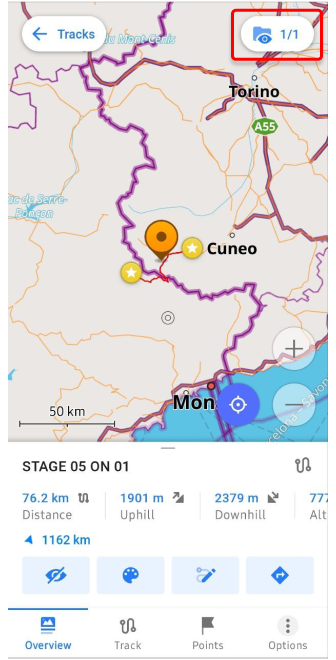
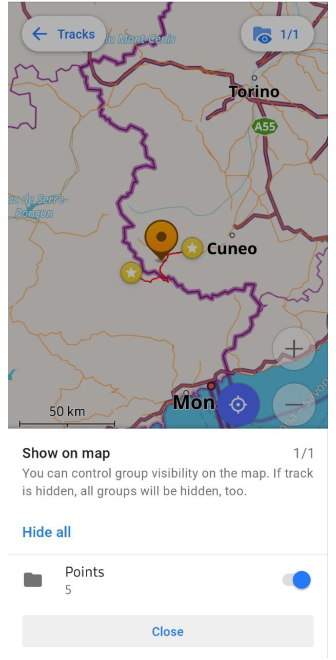
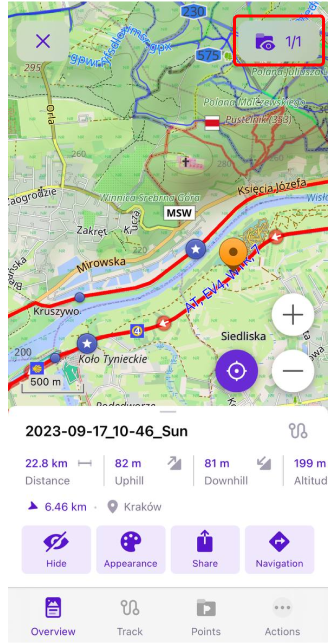
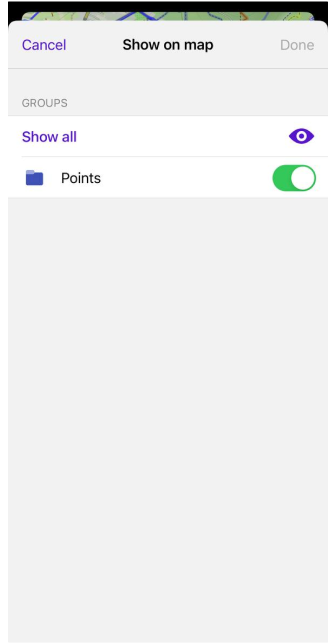
Manage the visibility of groups on the map: if you hide one track, the entire group will also be hidden.
You can switch group waypoints on or off on the map using the button in the upper right corner of the context menu of the track on the map. Tap it and select the required action.
Display Custom GPX Tags
- Android
- iOS
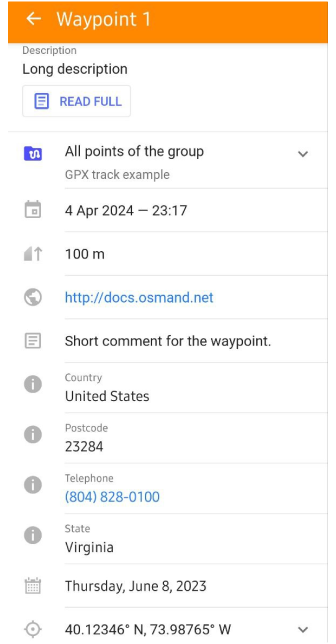
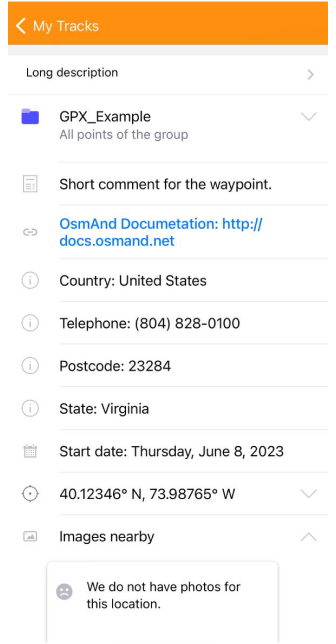
Example XML code of Waypoint tags
  <wpt lat="40.123456" lon="-73.987654">
    <ele>100</ele>
    <time>2024-04-04T13:12:11Z</time>
    <name>Waypoint 1</name>
    <desc>Long description</desc>
    <link href="http://docs.osmand.net" />
    <type></type>
    <cmt>Short comment for the waypoint.</cmt>
    <extensions>
      <osmand:country>United States</osmand:country>
      <osmand:address>Floyd Avenue (The Fan) 907, Richmond</osmand:address>
      <osmand:color>#ff4e4eff</osmand:color>
      <osmand:background>circle</osmand:background>
      <osmand:icon>place_town</osmand:icon>
      <osmand:postcode>23284</osmand:postcode>
      <osmand:telephone>(804) 828-0100</osmand:telephone>
      <osmand:state>Virginia</osmand:state>
      <osmand:start_date>Thursday, June 8, 2023</osmand:start_date>
    </extensions>
  </wpt>
Example XML code of Route point tags
  <rte>
    <name>Route 1</name>
    <desc>A sample route</desc>
    <rtept lat="40.123456" lon="-73.987654">
      <ele>110</ele>
      <name>Route Point 1</name>
      <desc>Point 1 of the route</desc>
      <extensions>
        <osmand:country>United States</osmand:country>
        <osmand:address>Floyd Avenue (The Fan) 907, Richmond</osmand:address>
        <osmand:color>#ff4e4eff</osmand:color>
        <osmand:background>circle</osmand:background>
        <osmand:icon>place_town</osmand:icon>
        <osmand:postcode>23284</osmand:postcode>
        <osmand:telephone>(804) 828-0100</osmand:telephone>
        <osmand:state>Virginia</osmand:state>
        <osmand:start_date>Thursday, June 8, 2023</osmand:start_date>
      </extensions>
    </rtept>
  </rte>
Tags:
| Parameter | Description |
|---|---|
lat | Latitude is one of the geographic coordinates by which you can determine a location. |
lon | Longitude is another of the geographic coordinates by which you can determine a location. |
time | Timestamp is the date and time when the point was recorded. |
name | Name is the name of the point. Any characters are allowed. |
desc | Description contains additional information about the point. |
type | Select group is the name of the OsmAnd folder in which this waypoint is saved. |
cmt | Comment is a short comment on a point. |
link | Link is a link to any sources. |
ele | Elevation is a point elevation. |
Extensions:
| Extension | Description |
|---|---|
osmand:icon | Icon is the name of the icon you selected. |
osmand:color | Color is the color in HEX format. |
osmand:background | Background is the shape of the icon, such as a circle, octagon, or square. |
osmand:country | Country is the name of country. |
osmand:address | Address is the address. |
osmand:postcode | Postcode is the postcode. |
osmand:telephone | Telephone is the telephone number. |
osmand:state | State is the state name. |
osmand:start_date | Start date is the schedule data of a point. |
Waypoints are recorded with the track in the GPX file. Each of these waypoints has its own set of tags for description. All tags directly related to the description of waypoints that can be edited directly in the OsmAnd application are listed in this section.
To change the Waypoint description, you can go one of the following ways:
-
Find the required track in the Menu → My Places → Tracks tab list.
-
Tap the track on the map, if it is included in the list of visible.
-
Tap the required waypoint if it is visible on the map.
Then in the Tracks Context menu tap points, the field of the required folder with available waypoints and the Waypoint you are looking for. Select menu Actions → Edit GPX waypoint and make changes. You cannot change the creation date of a point, timestamp, in the application.
Amenity tags that describe additional information, such as hours of operation or phone number, specific to the POI take that information from OpenStreetMap data or data you entered when creating the POI. You can edit such tags and custom tags only in the code of the GPX file, which you can open with any text editor on your device.
Analyze by Intervals
This feature is currently not available for the iOS version of the OsmAnd app.
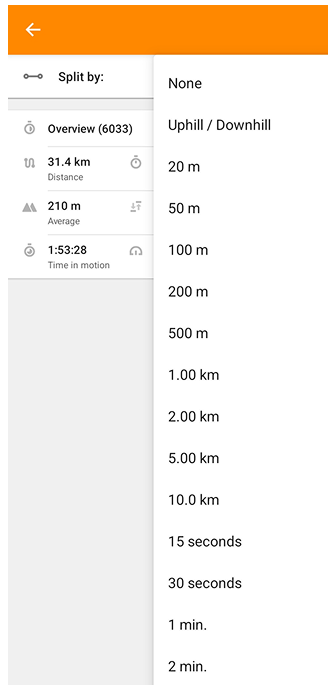
The Analyze by Intervals option allows you to divide a track into sections and view detailed statistics for each part of the route. Tracks can be split by distance, time, or uphill/downhill parameters.
To open this option:
Options → Analyze by intervals → choose the desired split mode
Split by Distance
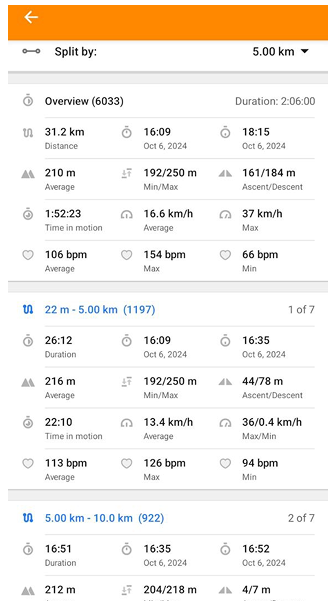
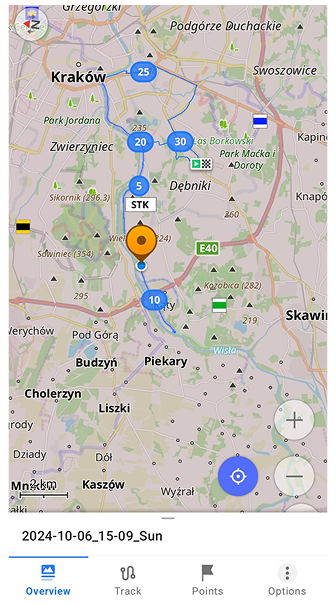
This option allows you to divide a track into fixed distance intervals and analyze detailed statistics for each segment. Available distance intervals are 20 m, 50 m, 100 m, 200 m, 500 m, 1 km, 2 km, 5 km, and 10 km. After choosing a distance interval, the track is displayed as a list of segments.
For each segment, you can view:
- Distance covered.
- Duration.
- Average, minimum and maximum altitude.
- Ascent and descent.
- Time in motion.
- Average and maximum speed.
When you tap on any segment in the list, the map view shows the full track with its intervals and opens the context menu for the track at the bottom of the screen. On the map, interval labels support two actions: tap to open the track overview panel, and long-press to open the track context menu.
Split by Time
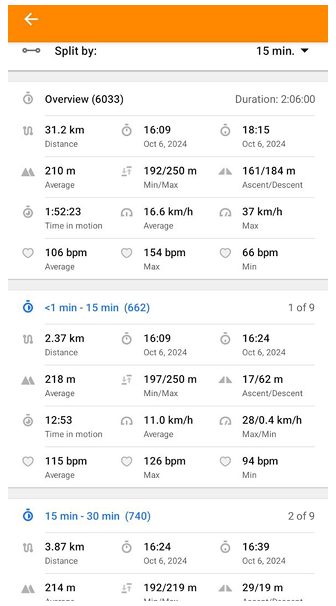
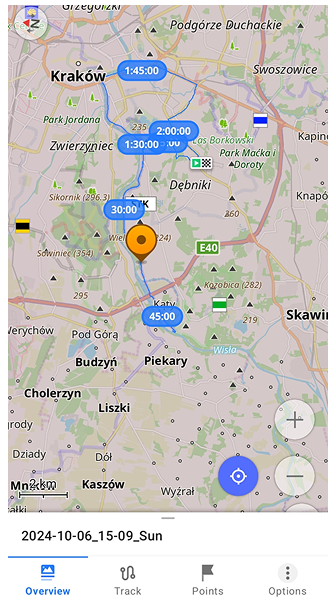
The Split by Time option divides a track into intervals of equal duration. You can choose between 1 min, 2 min, 2.5 min, 5 min, 10 min, 15 min, 30 min, and 60 min. The way the intervals are displayed, the statistics provided for each segment, and how they appear on the map are the same as in Split by Distance section.
Split by Uphill/Downhill
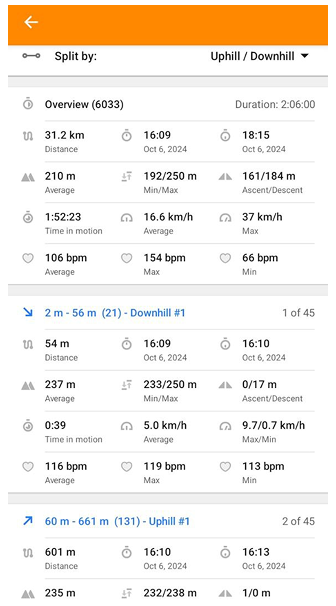

This option divides a track into segments based on elevation changes. Each interval is classified as uphill, downhill, or flat. The way the intervals are displayed and the statistics provided for each segment are the same as in the Split by Distance section.
On the map, segments are marked with colored labels at the start of each interval:
- Uphill segments (red labels) show an up arrow, the segment index, and the average slope in percent (for example, ↑ 11. 2%).
- Downhill segments (green labels) show a down arrow, the segment index, and the average slope in percent (for example, ↓ 12. -2%).
- Flat segments (blue labels) show the flat section distance (for example, 616 m, 411 m).
Heart Rate Metrics

This option allows you to view average, minimum, and maximum heart rate values (beats per minute, bpm) for each interval of your track. Heart rate data is taken from the track GPX file or recorded directly from a connected external heart rate sensor (BLE). If no heart rate data is available, this row is hidden in the interval table.
Note: You can connect a BLE heart rate monitor via Plugin → External Sensors to record HR data directly in OsmAnd.
GPS Filter
This feature is currently not available for the iOS version of the OsmAnd app.
Options → GPS filter
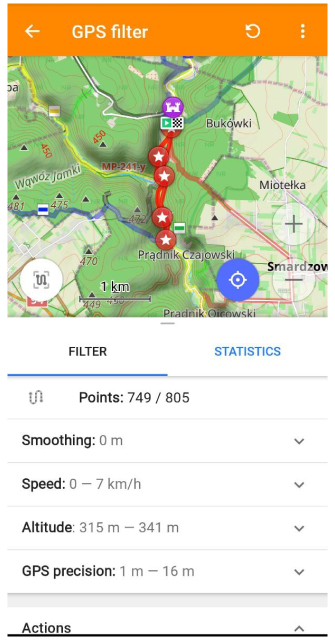
This filter allows you to improve your track statistics by excluding unnecessary or incorrect data. You can filter out track points that don't fit your track parameters, and as a result, get a more accurate graph and visual route line without distortion or recording noise. You can make changes with filters such as Smoothing, Speed, Altitude, and GPS Precision, which hide filtered points from the current track. Besides, in the Statistics menu, you can check how your changes are displayed on the graph before you save them. You can also Reset to original and Save as a copy of your track in this filter without saving the original one.
The Android GPS Filter app page includes the following:
- A map with a saved track and an extra button, My track location (it aligns a track to the center of a map).
- Buttons Refresh and Menu at the top (Menu opens Action field at the bottom of the page).
- Blocks Filter, Statistics, Action.
Filter Menu
In this menu, you can change some parameters of your track such as Smoothing, Speed, Altitude, or GPS precision using filters. The menu is divided into a Points part and an Actions part.
| Points |
|---|
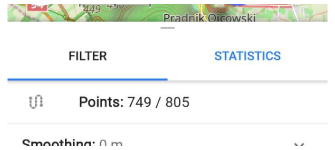
| This part shows the number of points after filtering and the total number of points on the selected track before filters were used. |
 |
| Actions |
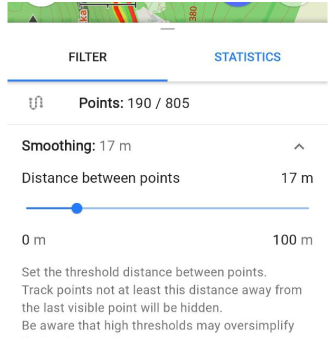
| Smoothing. Sets the threshold distance between points. Track points are at least this distance from the last visible point are hidden. All points on the track, that are at a distance from each other less than the distance selected by the filter, will be hidden. Track points are counted from the last visible point. Note, that high thresholds can oversimplify the track geometry. |
 |
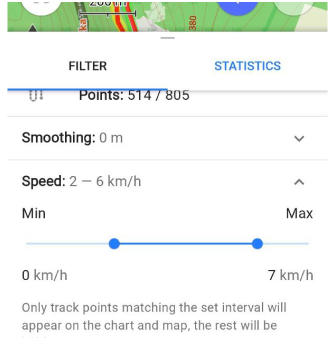
| Speed. Only the track points corresponding to the selected speed interval are displayed on the graph and the map, the others are hidden. |
 |
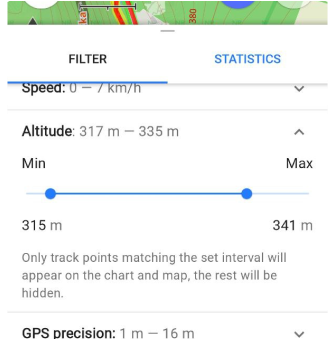
| Altitude. Only the track points corresponding to the selected altitude interval are displayed on the graph and the map, the others are hidden. |
 |
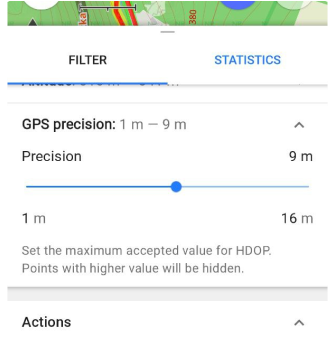
| GPS precision. Sets the maximum permissible value for HDOP. Points with a higher value are hidden. |
 |
Statistics
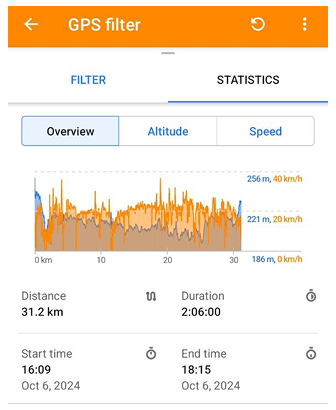
The Statistics tab displays information about the modified track, meaning the track without filtered values. It is displayed in the statistics blocks and graph data.
- The Data part shows statistics similar to the Filter menu.
- The Graph part displays three types of graphs by parameters: Overview, Altitude, and Speed. This functional is a copy of track Graph.
Actions
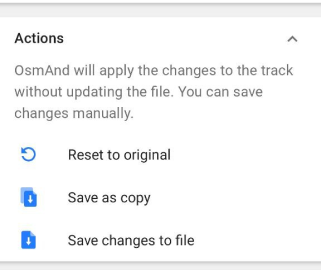
The list of actions is available at the bottom of the Filter or Statistics tab. OsmAnd applies all changes made to the track without updating the file, but you can save the changes manually.
- Reset to original. Allows you to return the parameters to their original state.
- Save as copy. Allows you to save the track as a new one.
- Save changes to file. Allows you to rewrite the track with the new parameters.