Category:World War II forces of Australia in Australia
Jump to navigation
Jump to search
Subcategories
This category has the following 2 subcategories, out of 2 total.
F
- Fort Cowan Cowan (3 F)
Media in category "World War II forces of Australia in Australia"
The following 194 files are in this category, out of 194 total.
-
 056420Cole1943.jpg 364 × 280; 34 KB
-
 102 Squadron RAAF Liberator aircrew Dubbo July 1945 AWM P01459.002.jpg 640 × 439; 150 KB
-

-
 12 Squadron RAAF Vengeance Australia WWII AWM NEA0092.jpg 328 × 450; 18 KB
-
 13 Squadron RAAF Hudson aircrew Hughes NT Feb 1943 AWM NWA0064.jpg 233 × 325; 15 KB
-
 13 Squadron RAAF Hudson aircrew Hughes NT Feb 1943 AWM NWA0074.jpg 635 × 475; 159 KB
-

-
 13 Squadron RAAF mobile kitchen Hughes NT Feb 1943 AWM NWA0063.jpg 450 × 334; 22 KB
-
 13 Squadron RAAF officer's mess Hughes NT Feb 1943 AWM NWA0061.jpg 640 × 466; 213 KB
-

-

-
 13 Squadron RAAF stores personnel Hughes NT Feb 1943 AWM NWA0076.jpg 450 × 338; 31 KB
-
 13 Squadron RAAF Ventura aircrew Gove NT AWM NWA0923.jpg 640 × 479; 202 KB
-
 13 Squadron RAAF Ventura ground crew Gove NT Jul 1945 AWM NWA0920.jpg 640 × 479; 205 KB
-
 14 Squadron RAAF Armourers Pearce WA AWM P00296.034.jpg 640 × 496; 189 KB
-
 14 Squadron RAAF photographic section Pearce WA AWM P00296.033.jpg 640 × 469; 181 KB
-
 14th Heavy AA Battery gun crew at Darwin in November 1942.jpg 492 × 638; 207 KB
-
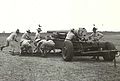
 155 mm GPF gun deployment Lytton Qld Nov 1943 AWM 060032.jpg 640 × 411; 167 KB
-
 155 mm GPF gun deployment Lytton Qld Nov 1943 AWM 060035.jpg 640 × 420; 143 KB
-
 155 mm GPF gun in travelling position Lytton Qld Nov 1943 AWM 060033.jpg 624 × 420; 145 KB
-
 155 mm gun and crew Lytton Qld Nov 1943 AWM 060027.jpg 450 × 296; 20 KB
-
 155 mm gun Queensland Feb 1945 AWM 087507.jpeg 366 × 341; 18 KB
-
 18 pounder gun and crew Moreton Island Qld Nov 1943 AWM 060079.jpg 640 × 398; 142 KB
-
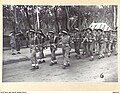 2 11th Commando Squadron march past Feb 1945 uncropped.jpg 640 × 499; 225 KB
-
 2 11th Commando Squadron march past Feb 1945.jpg 612 × 409; 208 KB
-
 2 Squadron RAAF aircrew Hughes NT Apr 1943 AWM NWA0246.jpg 640 × 494; 205 KB
-
 2 Squadron RAAF aircrew Hughes NT Mar 1943 AWM NWA0180.jpg 450 × 328; 22 KB
-
 2 Squadron RAAF Hudson aircrew Hughes NT AWM NWA0194.jpg 450 × 331; 31 KB
-
 2 Squadron RAAF Hudson aircrew Hughes NT Feb 1943 AWM NWA0073.jpg 337 × 450; 23 KB
-
 2 Squadron RAAF Hudson aircrew Hughes NT Mar 1943 AWM NWA0182.jpg 640 × 459; 198 KB
-
 2 Squadron RAAF Hudson aircrew Hughes NT Mar 1943 AWM NWA0185.jpg 337 × 450; 23 KB
-
 2 Squadron RAAF Hudson aircrew Hughes NT Mar 1943 AWM NWA0186.jpg 640 × 494; 210 KB
-
 2 Squadron RAAF Hudson aircrew Hughes NT Mar 1943 AWM NWA0187.jpg 640 × 494; 202 KB
-
 2 Squadron RAAF Hudson aircrew Hughes NT Mar 1943 AWM NWA0188.jpg 450 × 337; 27 KB
-
 2 Squadron RAAF Hudson aircrew Hughes NT Mar 1943 AWM NWA0189.jpg 450 × 338; 29 KB
-
 2 Squadron RAAF Hudson aircrew Hughes NT Mar 1943 AWM NWA0191.jpg 640 × 494; 205 KB
-
 2 Squadron RAAF Hudson aircrew Hughes NT Mar 1943 AWM NWA0192.jpg 336 × 462; 114 KB
-
 2 Squadron RAAF Hudson aircrew Hughes NT Mar 1943 AWM NWA0193.jpg 450 × 336; 22 KB
-
 2 Squadron RAAF Hudson aircrew Hughes NT Mar 1943 AWM NWA0197.jpg 432 × 331; 23 KB
-
 2 Squadron RAAF Hudson aircrew Hughes NT Mar 1943 NWA0190.jpg 334 × 457; 110 KB
-
 2 Squadron RAAF Hudson aircrew N.T. Oct 1942 AWM 027606.jpg 450 × 313; 27 KB
-

-
 2 Squadron RAAF Hudson fitters Hughes NT Mar 1943 AWM NWA0172.jpg 245 × 329; 17 KB
-
 2-12 Field Ambulance (AWM 060820).jpg 448 × 329; 81 KB
-
 2-1st Infantry battalion parade.jpg 450 × 339; 63 KB
-
 2-6 Bn training Qld 1944.jpg 450 × 334; 78 KB
-
 2-6th div cavalry.jpg 450 × 341; 82 KB
-

-
 2-9th Field Regiment parade February 1945 (AWM image 086600).JPG 614 × 429; 99 KB
-
 20 Squadron RAAF Catalina aircrew Cairns 1944 AWM NEA0322.jpg 450 × 343; 23 KB
-
 21 Squadron RAAF Liberator aircrew Fenton NT Mar 1945 AWM NWA0727.jpg 640 × 457; 175 KB
-
 21 Squadron RAAF Liberator aircrew Fenton NT Mar 1945 AWM NWA0728.jpg 640 × 461; 178 KB
-
 21 Squadron RAAF Liberator aircrew Fenton NT Mar 1945 AWM NWA0730.jpg 640 × 471; 213 KB
-
 21 Squadron RAAF Liberator aircrew Fenton NT Mar 1945 AWM NWA0731.jpg 637 × 471; 101 KB
-
 21 Squadron RAAF Liberator aircrew Fenton NT Mar 1945 AWM NWA0732.jpg 640 × 463; 160 KB
-
 23 Sqn (AWM NWA0915).jpg 450 × 352; 69 KB
-
 23 Squadron RAAF Liberator aircrew Darwin NT 1944 AWM P02028.053.jpg 450 × 341; 30 KB
-

-

-
-

-
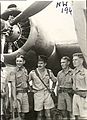
 24 Squadron RAAF Liberator aircrew Fenton NT AWM NWA0625.jpg 236 × 331; 19 KB
-
 24 Squadron RAAF Liberator aircrew Fenton NT AWM NWA0626.jpg 640 × 469; 185 KB
-
 24 Squadron RAAF Liberator aircrew Fenton NT AWM NWA0628.jpg 336 × 462; 104 KB
-
 24 Squadron RAAF Liberator aircrew Fenton NT AWM NWA0629.jpg 640 × 471; 241 KB
-
 24 Squadron RAAF Liberator aircrew Fenton NT AWM NWA0630.jpg 640 × 466; 151 KB
-
 24 Squadron RAAF Liberator aircrew Fenton NT AWM NWA0632.jpg 640 × 470; 223 KB
-
 24 Squadron RAAF Liberator aircrew Fenton NT Jan 1945 AWM NWA0710.jpg 583 × 463; 199 KB
-
 24 Squadron RAAF Liberator aircrew Fenton NT Jan 1945 AWM NWA0711.jpg 640 × 469; 211 KB
-
 24 Squadron RAAF Liberator at Fenton NT 1944 AWM NWA0617.jpg 640 × 475; 197 KB
-

-
 24 Squadron RAAF Liberator engine maintenance Fenton NT AWM NWA0618.jpg 335 × 463; 104 KB
-
 24 Squadron RAAF Liberator maintenance 1944 AWM NWA0605.jpg 450 × 333; 23 KB
-
 24 Squadron RAAF Liberator tail guns Fenton NT 1944 AWM NWA0619.jpg 640 × 479; 198 KB
-
 24 Squadron RAAF Liberator tail guns Fenton NT 1944 AWM NWA0624.jpg 338 × 460; 98 KB
-
 24 Squadron RAAF Liberator tyre NT 1944 AWM NWA0607.jpg 239 × 332; 16 KB
-
 25 pdr Short Jeeps.jpg 450 × 332; 53 KB
-
 3.7 inch AA gun crew Lytton Qld Nov 1943 AWM 060061.jpg 424 × 278; 28 KB
-
 3.7 inch AA gunner Lytton Qld Nov 1943 AWM 060056.jpg 335 × 484; 122 KB
-
 3.7 inch AA gunners Lytton Qld Nov 1943 AWM 060055.jpg 636 × 411; 218 KB
-
 31 Sqn (NWA0030).jpg 637 × 465; 114 KB
-

-

-

-

-

-

-

-

-
 3OTU (AWM 128145).jpg 450 × 332; 39 KB
-
 4.7 inch gun and crew Fort Lytton Nov 1943 AWM 060049.jpg 424 × 274; 17 KB
-
 42 Squadron RAAF Catalina Darwin 1944 AWM P01630.018.jpg 450 × 298; 16 KB
-
 43 Squadron RAAF Catalina aircrew Cairns Jan 1944 AWM NEA0343.jpg 450 × 337; 25 KB
-
 43 Squadron RAAF Catalina aircrew Darwin Oct 1944 AWM NWA0705.jpg 640 × 494; 207 KB
-
 43 Squadron RAAF Catalina Cairns Jan 1944 AWM NEA0328.jpg 329 × 450; 19 KB
-
 43 Squadron RAAF Catalina taxiing May 1945 AWM NWA0904.jpg 450 × 338; 18 KB
-
 452 Squadron RAAF personnel Strauss NT 1943 AWM NWA0465.jpg 450 × 334; 25 KB
-
 452 Squadron RAAF Spitfire pilots Strauss NT 1943 AWM NWA0351.jpg 450 × 328; 32 KB
-
 452 Squadron RAAF Spitfire pilots Strauss NT 1944 AWM NWA0709.jpg 450 × 343; 24 KB
-

-
 457 Sqn Spitfire Livingston Feb 1943.jpg 425 × 316; 67 KB
-
 5th Bn, Victorian Scottish Regiment Apr 1940.jpg 616 × 461; 183 KB
-
 6 inch Mk XI gun and crew Moreton Island Qld Nov 1943 AWM 060072.jpg 639 × 480; 175 KB
-
 6 inch Mk XI gun and crew Moreton Island Qld Nov 1943 AWM 060073.jpg 640 × 477; 149 KB
-
 6-inch gun and crew Leighton Battery Fremantle Feb 1943 AWM 029133.jpg 640 × 434; 206 KB
-
 67 Sqn (AWM VIC0192).jpg 450 × 324; 52 KB
-
 67 Squadron RAAF Anson Laverton 1943 AWM 050509.jpg 450 × 296; 22 KB
-
 7 Comm Unit (AWM P01877-006).jpg 450 × 338; 49 KB
-
 7 Div Adelaide (030127-05).jpg 639 × 425; 175 KB
-
 7 Sqn (AWM NEA0032).jpg 640 × 469; 171 KB
-
 7 Squadron RAAF Beaufort aircrew 1943 AWM P02190.001.jpg 450 × 297; 24 KB
-
 76 Squadron RAAF armourers Strauss NT Jan 1943 AWM NWA0008.jpg 330 × 456; 92 KB
-

-

-
 77 Squadron RAAF P-40 nose art Strauss NT Jan 1943 AWM NWA0012.jpg 450 × 337; 16 KB
-

-
 83 Sqn (AWM 060742).jpg 640 × 482; 218 KB
-
 83 Squadron RAAF parachute airing NT Nov 1943 AWM 060740.jpg 316 × 457; 127 KB
-
 83 Squadron RAAF parachute checking NT Nov 1943 AWM 060741.jpg 612 × 403; 200 KB
-
 84 Squadron RAAF Boomerangs WWII AWM 128009.jpg 450 × 317; 12 KB
-
 84 Squadron RAAF Kittyhawks on Horn Island 1940 AWM 128034.jpg 450 × 315; 14 KB
-

-
 87 sqn (AWM NWA0818).jpg 450 × 342; 68 KB
-
 87 Squadron RAAF personnel Coomalie Creek NT 1945 AWM P01894.001.jpg 640 × 367; 130 KB
-
-
 87 Squadron RAAF PR photo processing Mar 1945 AWM NWA0819.jpg 450 × 348; 23 KB
-
 87 Squadron RAAF Radio Section Aug 1945 AWM P01894.002.jpg 640 × 496; 221 KB
-
 90th BG Liberator Fenton NT 1943 AWM NWA0499.jpg 640 × 478; 200 KB
-
 AANS sisters at 2-1 General Hospital in Sept 1942.jpg 450 × 336; 30 KB
-

-
 Arming 76 Squadron RAAF P-40 Strauss NT Jan 1943 AWM NWA0006.jpg 450 × 329; 26 KB
-
 Arming 76 Squadron RAAF P-40 Strauss NT Jan 1943 AWM NWA0007.jpg 233 × 323; 30 KB
-

-
 Armourers with 2 Squadron RAAF Hudson dorsal gun turret AWM NWA0175.jpg 640 × 494; 166 KB
-
 Aust 4th Armoured Bde at Southport 1944 (AWM 063203).jpg 640 × 416; 207 KB
-
 Aust Grant (AWM P01022-003).jpg 639 × 480; 198 KB
-
 Australian five year veterans at Central Station 1 August 1945.jpg 450 × 325; 78 KB
-
 Australian Owen gun exercise, April 1944, Queensland.jpg 253 × 283; 30 KB
-
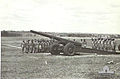
 Australians training with 155 mm gun Queensland Feb 1945 AWM 086726.jpeg 598 × 434; 218 KB
-
 AWM 060650 Jungle Training Centre Canungra November 1943.jpg 450 × 337; 24 KB
-
 Bombing up 13 Squadron RAAF Ventura Jun 1945 AWM NWA0925.jpg 640 × 478; 200 KB
-
 Bombing up 13 Squadron RAAF Ventura Jun 1945 AWM NWA0926.jpg 640 × 480; 196 KB
-

-
 Bombing up 2 Squadron RAAF Hudson Mar 1943 AWM NWA0179.jpg 450 × 338; 25 KB
-
 Bombing up 24 Squadron RAAF Liberator NT 1944 AWM NWA0606.jpg 640 × 494; 175 KB
-
 Bren Carriers (AWM 053617).jpg 639 × 480; 202 KB
-
 Cleaning guns of 83 Squadron RAAF Boomerang Nov 1943 AWM 060743.jpg 640 × 423; 205 KB
-
 Commonwealth Air Aces of the Second World War CF90.jpg 800 × 578; 76 KB
-
 Crated Buffalo.jpg 450 × 316; 68 KB
-

-
 Drakeford and Truscott at Strauss NT Nov 1942 AWM NWA0417.jpg 450 × 338; 25 KB
-

-

-
 Flight Lieutent Kennedy of 13 Squadron RAAF Jun 1945 AWM NWA0927.jpg 340 × 467; 82 KB
-

-
 Flight Sergeant Warren of 31 Squadron RAAF Aug 1943 AWM OG0360A.jpg 217 × 334; 17 KB
-
-

-

-
 Heavy battery crew with searchlight Lytton Qld Nov 943 AWM 060036.jpg 614 × 429; 183 KB
-
 Inspection on 2 Squadron RAAF Hudson Mar 1943 AWM NWA0171.jpg 450 × 337; 28 KB
-
 Keith Truscott batting Strauss NT Jan 1943 AWM NWA0037.jpg 450 × 337; 24 KB
-
 LAC Knight of 83 Squadron RAAF NT Nov 1943 AWM 060744.jpg 640 × 423; 149 KB
-

-
 M3 Grant (AWM 028519).jpg 640 × 417; 93 KB
-
 Member of No. 20 Squadron RAAF.jpeg 640 × 477; 216 KB
-

-

-
 NT Force (AWM 150320).jpg 640 × 429; 192 KB
-
 NTSRU.jpg 787 × 600; 156 KB
-
 Portee (AWM 028675).jpg 450 × 339; 87 KB
-

-
-

-

-
 Servicing 7 Squadron RAAF Beaufort WWII AWM NEA0033.jpg 400 × 536; 76 KB
-
 SLNSW 12775 Returned soldiers 8th Field Ambulance taken for Miss Coxon AIF.jpg 1,400 × 1,101; 385 KB
-
 SLNSW 12784 Royal Engineers Permanent Fortress.jpg 1,400 × 1,084; 387 KB
-

-

-

-

-

-
 StateLibQld 1 164739 Dental examination during World War II.jpg 1,000 × 716; 53 KB
-
-
 StateLibQld 2 247419 Soldiers at Rollingstone, Queensland, 1943.jpg 896 × 624; 82 KB
-
 Tocumwal B-24 (VIC0376).jpg 639 × 484; 140 KB
-
 Townsville bombing (AWM 150159).jpg 300 × 393; 66 KB
-
 TSLI (AWM 119169).jpg 450 × 301; 67 KB
-

-

-

-
 Wirraway (AWM AC0141).jpg 639 × 485; 176 KB
-
 Wirraways Wagga (AWM P01254-006).jpg 440 × 328; 56 KB


.jpg)


.jpg)
.JPG)


.jpg)


.jpg)


.jpg)


.jpg)


.jpg)

.jpg)
.jpg)
.jpg)


.jpg)


.jpg)


.jpg)
.jpg)


.jpg)


.jpg)


.jpg)
.jpg)

.jpg)


.jpg)
.jpg)
.jpg)
.jpg)


.jpg)
.jpg)