Category:Taken with Oppo Find X5
Jump to navigation
Jump to search
Media in category "Taken with Oppo Find X5"
The following 100 files are in this category, out of 100 total.
-
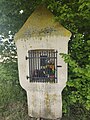 Bildstock Lonnig.jpg 3,072 × 4,096; 5.63 MB
-
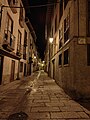 Calle del Agua Villafranca del Bierzo 2.jpg 3,072 × 4,096; 4.74 MB
-
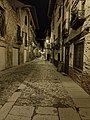
 Calle del Agua Villafranca del Bierzo 3.jpg 3,072 × 4,096; 2.55 MB
-
 Calle del Agua Villafranca del Bierzo 4.jpg 3,072 × 4,096; 2.47 MB
-
 Calle del Agua Villafranca del Bierzo.jpg 3,072 × 4,096; 4.51 MB
-
 Cane lozzese.jpg 4,096 × 3,072; 5.09 MB
-
 Func porcini.jpg 3,072 × 4,096; 4.63 MB
-
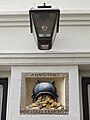 Gevelsteen in de Nadorststeeg, Amsterdam IMG20230704141741.jpg 2,095 × 2,791; 3.03 MB
-
 Glenfiddich Grande Couronne IMG20230730194507.jpg 1,861 × 3,568; 2.23 MB
-
 Glenfiddich Grande Couronne IMG20230730194518.jpg 1,680 × 3,344; 1.22 MB
-
 Groot cannabis-teken verdwenen in Chiang Mai IMG20240318210023.jpg 3,072 × 4,096; 5.36 MB
-
 Homenaje al Peregrino Villafranca del Bierzo.jpg 3,072 × 4,096; 3.09 MB
-
 Imagen de peregrino Villafranca del Bierzo.jpg 3,072 × 4,096; 2.37 MB
-
 Jabari Parker - FC Barcelona 2024.jpg 1,228 × 1,883; 274 KB
-
 Markel Irizar - TdF 2023 Stage 1 Bilbao-Bilbao (cropped).jpg 891 × 1,345; 375 KB
-
 Markel Irizar - TdF 2023 Stage 1 Bilbao-Bilbao.jpg 1,071 × 1,775; 585 KB
-
 Museo diocesano Imola - Anticamera rustica.jpg 4,096 × 3,072; 3.6 MB
-
 Museo diocesano Imola - Appartamento rosso 1.jpg 4,096 × 3,072; 4.47 MB
-
 Museo diocesano Imola - Appartamento rosso 2.jpg 4,096 × 3,072; 4.34 MB
-
 Museo diocesano Imola - Esterno San Rocco.jpg 4,096 × 3,072; 5.46 MB
-
 Museo diocesano Imola - Foto aula Oratorio di San Rocco.jpg 4,096 × 3,072; 3.31 MB
-
 Museo diocesano Imola - Giardino 4.jpg 1,844 × 4,096; 2.45 MB
-
 Museo diocesano Imola - Oratorio di San Rocco 1.jpg 3,072 × 4,096; 3.29 MB
-
 Museo diocesano Imola - Oratorio di San Rocco 2.jpg 4,096 × 3,072; 3.17 MB
-
 Museo diocesano Imola - Sala arte contemporanea.jpg 4,096 × 3,072; 3.45 MB
-
 Museo diocesano Imola - Sala terracotte.jpg 4,096 × 3,072; 3.71 MB
-
 Nederlands Consulaat in Venetië detail IMG20230828154007a.jpg 3,847 × 2,579; 4.85 MB
-
 Nederlands Consulaat in Venetië IMG20230828154244.jpg 3,072 × 4,096; 6.4 MB
-
 Noche en Villafranca del Bierzo.jpg 3,072 × 4,096; 3.77 MB
-
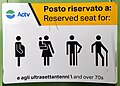
 Openbaar vervoer info Venetië - rugtasaanwijzing IMG20230829100516a.jpg 542 × 728; 304 KB
-
-
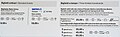 Openbaar vervoer info Venetië Tarieven 2023 IMG20230830125712a.jpg 3,072 × 948; 1.54 MB
-
 Paseo nocturno Villafranca del Bierzo.jpg 3,072 × 4,096; 2.19 MB
-
 Puente del otro lado ( Villafranca del Bierzo).jpg 3,072 × 4,096; 3.58 MB
-
 Puente del otro lado Villafranca del Bierzo.jpg 3,072 × 4,096; 3.82 MB
-
 San Nicolas (Villafranca del Bierzo).jpg 4,096 × 3,072; 3.59 MB
-
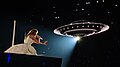 Taylor Swift Eras Tour TTPD Set Down Bad.jpg 4,000 × 2,250; 1.46 MB
-
 Taylor Swift Eras Tour TTPD Set Fortnight 2.jpg 4,000 × 2,250; 3.1 MB
-
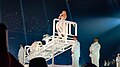 Taylor Swift Eras Tour TTPD Set Fortnight.jpg 4,000 × 2,250; 3.37 MB
-
 Wat Chiang Chom Paviljoen met liggende Boeddha - IMG20240211105257b.jpg 3,412 × 2,249; 5.29 MB
-
 Wat Chiang Chom Ubosot - IMG20240211104614b.jpg 3,360 × 2,388; 6.44 MB
-
 Wat Chiang Chom Ubosot afgedekte gaten voor de Luk Nimit bollen - IMG20240211104649b.jpg 3,678 × 2,706; 7.19 MB
-
 Wat Chiang Chom Ubosot en Chedi - IMG20240211104738b.jpg 2,208 × 2,782; 4.51 MB
-
 Wat Chiang Chom Ubosot en Chedi - IMG20240211110237b.jpg 4,002 × 2,953; 10.37 MB
-
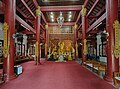
 Wat Chiang Chom Ubosot interieur - IMG20240211104703a.jpg 2,512 × 3,528; 6.24 MB
-
 Wat Chiang Chom Wihan - IMG20240211105144b.jpg 2,861 × 2,058; 4.31 MB
-
 Wat Chiang Chom Wihan altaar - IMG20240211105501b.jpg 3,072 × 4,096; 5.49 MB
-
 Wat Chiang Chom Wihan altaar detail - IMG20240211105453b.jpg 3,000 × 4,000; 4.2 MB
-
 Wat Chiang Chom Wihan interieur - IMG20240211105426b.jpg 3,873 × 2,886; 7.01 MB
-
 Wat Rong Tham Samakkhi Chedi IMG20240307110739a.jpg 2,004 × 2,568; 4.25 MB
-
 Wat Rong Tham Samakkhi Chedi IMG20240307110823a.jpg 2,310 × 3,347; 9.06 MB
-
 Wat Rong Tham Samakkhi Chedi IMG20240307110853a.jpg 2,928 × 1,984; 6.25 MB
-
 Wat Rong Tham Samakkhi Shinawatra begraafplaats info IMG20240307110946b.jpg 1,912 × 1,880; 2.74 MB
-
 Wat Rong Tham Samakkhi Ubosot IMG20240307110623a.jpg 2,812 × 1,884; 4.21 MB
-
 Wat Rong Tham Samakkhi Ubosot IMG20240307110703a.jpg 3,876 × 2,720; 9.64 MB
-
 Wat Rong Tham Samakkhi Wihan IMG20240307111147a.jpg 3,612 × 2,212; 4.71 MB
-
 Wat Si Bun Rueang Chedi IMG20240111105518.jpg 3,000 × 4,000; 5.55 MB
-
 Wat Si Bun Rueang Chinese style pavilion IMG20240111105910.jpg 3,000 × 4,000; 4.84 MB
-
 Wat Si Bun Rueang Entrance IMG20240111110235.jpg 3,000 × 4,000; 5.01 MB
-
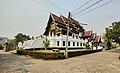
 Wat Si Bun Rueang Ho Trai building IMG20240111105943.jpg 3,000 × 4,000; 4.97 MB
-
 Wat Si Bun Rueang name in Thai script IMG20240111105450.jpg 4,000 × 3,000; 4.62 MB
-
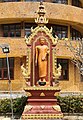
 Wat Si Bun Rueang Pilar IMG20240111105959.jpg 3,072 × 4,096; 4.96 MB
-
 Wat Si Bun Rueang Pilar IMG20240111110157a.jpg 2,688 × 3,598; 6.36 MB
-
 Wat Si Bun Rueang Resting pavilions IMG20240111110207.jpg 4,096 × 3,072; 5.75 MB
-
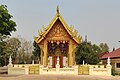
 Wat Si Bun Rueang Ubosot building IMG20240111105803a.jpg 3,630 × 2,652; 7.41 MB
-
 Wat Si Bun Rueang Wihan building IMG20240111105721a.jpg 2,894 × 3,834; 9.34 MB
-
 Wat Tamnak Suankhwan Sirimangkalachan Beeld IMG20240214120053a.jpg 2,244 × 3,161; 6.09 MB
-
 Wat Tamnak Suankhwan Sirimangkalachan Beeld IMG20240214120233b.jpg 2,430 × 3,305; 5.73 MB
-
 Wat Tamnak Suankhwan Sirimangkalachan Beeld van Sirimangkalachan IMG20240214120307a.jpg 2,376 × 2,916; 6.15 MB
-
 Wat Tamnak Suankhwan Sirimangkalachan Chedi IMG20240214120115a.jpg 2,628 × 3,275; 4.5 MB
-
 Wat Tamnak Suankhwan Sirimangkalachan Ho Trai Voorzijde IMG20240214120421b.jpg 2,580 × 3,627; 7.13 MB
-
 Wat Tamnak Suankhwan Sirimangkalachan Info over Sirimangkalachan IMG20240214120846a.jpg 2,352 × 2,615; 4.29 MB
-
 Wat Tamnak Suankhwan Sirimangkalachan Trom en Bel Toren IMG20240214120726.jpg 3,072 × 4,096; 4.12 MB
-
 Wat Tamnak Suankhwan Sirimangkalachan Ubosot IMG20240214115803a.jpg 3,072 × 2,104; 4.03 MB
-
 Wat Tamnak Suankhwan Sirimangkalachan Wihan-1 en Paviljoen IMG20240214120258a.jpg 2,784 × 2,072; 4.14 MB
-

-
 Wat Tamnak Suankhwan Sirimangkalachan Wihan-1 Vooraanzicht IMG20240214120150a.jpg 3,072 × 1,896; 4.03 MB
-
 Wat Tamnak Suankhwan Sirimangkalachan Wihan-1 Vooraanzicht IMG20240214120154a.jpg 2,724 × 3,521; 6.55 MB
-
 Бабурдун үйү, Сулайман Тоо.jpg 4,096 × 3,072; 4.74 MB
-
 Бабурдун үйү.jpg 3,072 × 4,096; 4.21 MB
-
 Жазгы Сулайман Тоо.jpg 4,096 × 3,072; 3.7 MB
-
 ОшМУ Сулайман Тоодон караганда.jpg 4,096 × 3,072; 4.16 MB
-
 Суайман Тоодого жазгы гүлдөр.jpg 4,096 × 3,072; 5.76 MB
-
 Сулайман Тоо 1.jpg 4,000 × 3,000; 3.6 MB
-
 Сулайман Тоо 2.jpg 4,000 × 3,000; 4.61 MB
-
 Сулайман Тоо 3.jpg 4,000 × 3,000; 3.14 MB
-
 Сулайман Тоо 4.jpg 4,096 × 3,072; 3.01 MB
-
 Сулайман Тоо 5.jpg 4,096 × 3,072; 5.88 MB
-
 Сулайман Тоо жазда.jpg 3,072 × 4,096; 5.01 MB
-
 Сулайман Тоо жазында.jpg 4,096 × 3,072; 6.06 MB
-
 Сулайман Тоо – үңкүр жаны.jpg 3,072 × 4,096; 4.69 MB
-
 Сулайман Тоо, күн батуу учуру 1.jpg 4,000 × 3,000; 3.11 MB
-
 Сулайман Тоо, күн батуу учуру.jpg 4,096 × 3,072; 3.89 MB
-
 Сулайман Тоо.jpg 4,000 × 3,000; 3.23 MB
-
 Сулайман тоо.jpg 4,000 × 3,000; 3.87 MB
-
 Сулайман Тоодо өрүк гүлдөгөн мезгил.jpg 4,096 × 3,072; 3.83 MB
-
 Сулайман Тоодогу окуучулар.jpg 4,096 × 3,072; 3.13 MB
-
 Сулайман Тоодогу үңкүр.jpg 3,072 × 4,096; 4.83 MB
-
 Сулайман тоодон шаарга карай.jpg 4,000 × 3,000; 5.21 MB
-
 Тоодогу үңкүр.jpg 3,072 × 4,096; 4.72 MB


.jpg)


.jpg)

.jpg)


